Sunday, June 14, 2009

Beef A La Mode - Liz's Version


Beef A La Mode

I saw this recipe in Gourmet Traveller but changed it significantly to suit my own tastes and small kitchen. You can't believe how much I can't wait until my fiance and I move into our new house with it's giant kitchen. Then I can make things properly!


INGREDIENTS

2kg beef chuck, in 4cm cubes
150g flour for dusting
1 tsp red peppercorns, crushed
2 tsp Maldon Salt
60gm vegetable shortening
12 baby carrots
1 small celeriac, sliced thinly
1 celery heart, diced
12 shallots, cut in half
2tbsp red wine vinegar
350mL red wine, sweet
2 tomatoes, finely chopped
1 litre vegetable stock
1 sprig fresh thyme and fresh bay leaf


Instructions
Coat beef chunks in flour seasoned with pepper and salt.

Fry for a couple minutes on each side. I had to do this in batches.

Scrape the bottom of the pan to remove sediment.

Place each batch into the crockpot with the crockpot on high.

Toss the vegetables minus the tomatoes into the fry pan. Cook for 5-7 minutes.

Remove vegetables and cover with foil.

Deglaze pan with red wine vinegar, scraping the bottom of the pan into the sauce then add red wine, getting as much of the pieces from the pan into the mixture.

Let cook until reduced. About 5-10 minutes.

Add tomatoes, vegetables, stock and herbs to crockpot and let bubble away for 4-5 hours.
Serve in bowl to large greedy hungry men and yourself, if you can get any.


Tuesday, June 9, 2009

Thank you!

Blog Fairy has remade my blog! Check her out at The Blog Fairy, for she does wonderful works, including what you see now!

Favourites

Why Study When I Can Cook? - Great Blog!
Erin Cooks Raised Doughnuts - Best Doughnut Recipe EVER
The Blog Fairy - Making Custom Blogs since... who knows when!

Monday, June 8, 2009

Grand Marinier, White Chocolate and Raspberry Cupcakes with Grand Marinier Marscapone Icing


For the Cupcakes:
60g almond meal
125g SR Flour
125g butter
100g caster sugar
2 eggs
60mL Grand Marinier
75g white chocolate, broken up into tiny 3mm rubble

For the Icing:
30mL Grand Mariner
2 tbsp Icing Sugar
250g Marscapone

200g raspberries


Preheat oven to 190c.

Combine almonds and flour and a pinch of salt in a bowl, sifted. Using an electric mixer, cream together butter and sugar, slowly adding one egg at a time. Add liquor and flour mixture until combined then stir in chocolate pieces.

Bake 20 minutes in lined 12-cupcake tin. Transfer to wire rack to cool.

Combine marscapone, liquor and sugar in a bowl and use as icing. Top cooled cupcakes with icing and rasperries and sift sugar on top to decorate.
Deeeeelicious!

Monday, May 18, 2009

Avocado a Day - Day 15


Avocado Margarita

30mL tequila
30mL lime juice
15mL Grand Marinier
1/4 avocado
5 ice cubes
Rock Salt to Decorate

Ignore the fact that this photo was clearly taken during the daytime and that my glass is a martini glass and not a margarita glass and you have yourself a delicious drink.

Place all ingredients bar salt in the blender and whizz until smooth. On a clean glass, use a slice of lime with a slash cut into it to wipe the rim of the glass down. Pour salt on the table and rub the rim of the glass in the salt. Top with lime slice and pour alcoholic beverage in. Drink!

How I feel today: Happy, but that could be because I was drinking before noon.

Sunday, May 17, 2009

Avocado a Day - Day 14


Smoked Salmon Avocado Baguettes with Baby Spinach and Rocket

I bet you're wondering where I went for the last week. Where's my avocados? I am afraid to say I had a major emergency in my life and had to spend a week elsewhere and while I brought my camera, I was unable to have a workable kitchen and only ate avocados from their premade green packets.

But, without a photo, I also made Avocado Mousse. Two avocados, 60g sugar, 1/4 cup hot water and the juice of two limes with whipped cream to serve and some berries on top. Melt the sugar in the water and process the avocados. Slowly pour sugar mixture into the funnel tube as the processor continues. Add lime. Put i serving containers and refrigerate 4 hours. Pretty good!

How I've been feeling: A bit up and down. When the stress got to me from the week I was pretty bad. My skin and hair are still doing amazing and I will have update photos from that coming shortly. I also feel immensely thinner, but it could just be the packets of hospital grade food I've been eating.

Sunday, May 10, 2009

Avocado a Day - Day 7 - With Pictures

Day 7 - Avocado and Roast Beef Sandwich on Seed Bread


After undertaking this experiment I have come across much information regarding avocados. First off is that they're technically a berry. Also, the name avocado comes from a Spanish name, meaning 'testicle'. They are considered an aphrodesiac and a fertility fruit. Worrisome for me! Hopefully not so much for you!

Another friend of mine was certain they became poisonous once cooked. This is not true and I cannot find any evidence supporting this. They are, however, poisonous to some dogs, cats and birds - so be careful who you feed these to.

Avocados are higher in both potassium and fibre than a banana and contain a lot of vitamins that are harder to obtain in other foods, such as Vitamin K and E, both which are famous for hair and skin youthening properties. 75% of the avocado's calories come from fat. Good fat. Monosaturated fat.

Now, time for my pictorial update. You'll be INSANELY surprised.

Hair before:
Hair after:

Skin before:Skin after:


Let it be known I did not change my hair products nor my skincare products at all during this time!

My hair is obviously and definitely more shiny, silky and smooth. I did not wash it before this photo, either. My skin, while still roughly the same, has a slightly more firm and dewy appearance. No new blemishes have appeared.

Today I feel: Happy. Well balanced. I've been going to the bathroom much better lately and have been eating a bit worse than normal but maintaining my appearance. I am more energetic and even worked 12 hours last night from waking up at 8am (worked from 4pm til 4am) and was not very exhausted when I finally got home. Slept well, as well.

Saturday, May 9, 2009

Avocado a Day - Day 6


Breakfast of Sotboiled Eggs with Silverside Avocado Soldiers

I am very certain this would taste better with proscutto. Sadly, I cannot have proscutto and the closest form of it I could find that was pork free was corned silverside. However, all was not lost as it was delicious. Just wrap an avocado slice in a piece of proscutto, bacon or silverside and place under the broiler. Boil some eggs for four minutes and the silverside should be done (if you started the boiling water first) when the eggs are. Brilliant! Dip these little delights in the egg and they're amazing. Perfect to eat while watching the world go by in your window.

How I feel: Got less sleep last night, am a little tired but still managed to wake up early, go to the market, get more avocados and some lovely seed bread for lunch before my boyfriend even woke up. That never happened once in our 6 month relationship. He wakes before me usually.

Friday, May 8, 2009

Avocado a Day - Four & Five

Day 4 - Cobb Salad

Do you really need a recipe for Cobb Salad? Technically mine was vegetarian, but not because I'm vegetarian. I'm Jewish. I also used gorgonzola in place of feta (and added climbing beans fromy my garden). I can't have dairy and meat combined and I just love dairy so much (is there anything in this blog without dairy?) that I rarely eat meat. Actually, looking at this blog I can see it's been about two weeks since I ate a meat product that wasn't fish. No wonder I am starting to chew on things again. My eggs were runny but that's how I like them. I might even make little avocado soldiers for my boiled eggs in the morning. Ooh, there's an idea...

How I feel: My boyfriend asked if I did something to my hair! My theory is it takes 3 days for anything you eat to show up on your body, so this is a good sign. He did not know I was on the diet! There is a definite hair difference and I'll have to show you in three more days!


Day 5 - Chocolate Avocado Cupcakes

I got this recipe from a vegan site. Now, I'm aware I can't eat 12 cupcakes so this was merely an experiment so I could get some avocado intake on top of simply having a raw avocado today, which would've been boring to blog about. I changed the recipe around a bit to in
clude milk plus I added 40g of 87% chocolate... because I'm a chocoholic like that.

1 1/2c flour, I used bread (cause I like it)
3/4c unsweetened cocoa
1tsp baking powder
3/4 tsp salt
1 avocado

1c maple syrup
3/4c milk

1/3c oil
2tsp vanilla
40g chocolate

Now the recipe, like all recipes, states to mix the dry ingredients and then the wet ingredients in a seperate bowl and then combine. I'm lazy. I whizzed it all in the food processor. I'm so lazy I didn't even break up the chocolate. All 40 grams, in one bar (half a bar, really
. I used 60g another day) chucked in. Then while I waited, I ate an avocado raw from the little green package it comes in. I think I'm starting to like this diet!

180c/350F for 20-25 minutes.

Once baked allow to cool off tin. Cover with powdered sugar so nobody knows these cupcakes look exactly how they looked when you globbed them in carelessly, you lazy lazy girl you.

How I feel: Healthier, but it might be because I'm not sick anymore. But I've been waking up super early, falling asleep super quickly and sleeping a full 9 hours every night, even when I was sick! I have no idea if this is caused by the avocado, but it's sure not hurting! Also, my acrylic nails are due in for a fill on Tuesday. Usually by now I have a broken nail. I don't even have a chip! Usually this happens when my acrylic breaks free from my natural nail and becomes weak. My acrylic HAS broken free of my natural nail but my natural nail appears to be sturdy enough to support the acrylic and prevent cracks. Or I'm just delusional. It's been known to happen.


Also, just to be off-topic because I can and it's my blog! Look what I picked off my garden! And look what I made with it! It was, I must say, perfection.


Edit: So it turns out, I CAN eat 12 cupcakes. Oops.

Wednesday, May 6, 2009

Grilled Sesame Salmon and Salsa Rice

See, I am not eating JUST avocados this month and I dislike the idea of only posting avocado recipes every day. So we might just have TWO recipes a day from me. The horror!

Grilled Sesame Salmon

100g salmon steak
2 tbsp sesame seeds
2 tbsp honey
1 dash sesame oil
1 large dash soy sauce


Heat griddle pan and place sesame seeds on pan. While this is going on mix all ingredients in a shallow dish and coat salmon evenly. When the sesame seeds start jumping, place salmon sideways on pan. Cook for one minute, then move to be diagonal. Do with all sides, except only doing one minute on the short sides of the steak.

Salsa Rice


1/2 cup rice
1 cup water
2 spring onions, diced
1 mild green chilli or, for me, 1/4th of an insanely hot green chilli, seeded and deveined, diced
2 small tomatoes, diced
squeeze lime juice
pinch salt
pinch pepper
half a grated garlic bulb

Place all ingredients except rice and water in a bowl and let soak. Place rice in pan with 1/2 of salsa and heat until watery parts of salsa soak into the rice. Add one cup or rice and boil for 5 minutes, constantly stirring. Cover and take off heat and set aside. Make before salmon and then when the salmon is done (so.. 8 minutes), the rice should be fluffy and thouroughally cooked.

Finish off by putting the layer of salsa on the bottom, the rice as the second and the salmon on top. Feeds 1. :)

Avocado a Day - Day 3

Mexican Calzone

Crust
:

1kg bread flour
1 tsp salt
14g yeast
1 tbsp caster sugar
4tbsp olive oil
650mL lukewarm water

Seive flour and salt onto a clean work surface and make a very large well in the middle. Trust me. I underwelled mine and had to clean watery oil off the floor. Combine all liquid ingredients and wait 10 minutes. Pour liquid into well and slowly add more and more flour from the edges until doughy. Knead until springy. Place in warm bowl in warm area for 1 hour. Punch down and cut into 6 equal pieces. Put 5 in the fridge. Use one to feed two people or one person on an avocado experiment.

Filling:
100g refried beans
1 green onion, chopped finely
one clove crushed garlic
4 tablespoons salsa
4 tablespoons salsa verde
1 avocado
1 cup cheddar cheese

Brown onions and garlic in a little bit of olive oil. Add beans and salsa and heat up until paste like.


Mash avocado into crust, which has been rolled out to accomodate the calzone. About 1cm thick. Spoon salsa mixture onto avocado, fold over and press with fork to seal edges. Heap cheese on top. Place in preheated oven at it's hottest possible temperature and bake for 10 minutes until golden brown.


Today I feel: Okay. I woke up early again. My bowels seem more regular, nut nothing fascinatingly different. I still have the flu and my skin is still the same, but nothing new has appeared. No change appears to have occured in my hair. I was correct, yesterday I was delusional.

Tuesday, May 5, 2009

Avocado a Day - Day 2


Chocolate Avocado Smoothie

1 avocado
1/3c brown sugar
1/4c cocoa powder
2 tsp vanilla
2 cups full cream milk
1 cup greek yogurt

I am sure this sounds disgusting. It really does. It's delicious! The avocado is more of an 'essence' than it is a large cup of green. This makes quite a bit.. enough for four people.. so I have made it my entire breakfast. This photo is about 3/4 of the entire mixture, so you can see it makes quite a large smoothie if you want.

I got this recipe from my friend, writer of a very popular tofu cookbook. I changed the recipe slightly as hers was vegan.

How I feel today: I may be delusional but my skin seems to feel a bit more firm. I woke up exceedingly early this morning and well rested and climbed out of bed fairly quickly, which is not normal for me, as I leisurely get up; especially since I work nights mostly. I am finding I am simply eating healthier because avocados only seem to go in healthy foods and I am not fond of eating them by themselves. Of course, it's only day 2 and I'm probably delusional.

Avocado a Day for 30 Days Experiment - Day One!


I am doing an experiment over the next 30 days and documenting it here. I am going off a theory that an avocado a day will make your skin clearer, your bowels cleaner, your hair glossier and your attitude cheerier. We are on day one with this salad.

Avocado Walnut Salad with Lime and Avocado Dressing
1 green onion
1 small handful chopped walnuts
1 avocado
4 tbsp avocado oil
1 tsp Maldon salt
1 large handful baby spinach
1 homegrown fresh picked beefsteak tomato
zest and juice of one lime
red cracked pepper to taste

Today I feel: I am having a bad day, physically. I have a lot of acne on my chin currently and have the flu. Probably not the most ideal start to a diet, seeing as I am trying to see progress, but I digress. My hair is dried out on the ends and a bit limp. However seeing as there's FOUR superfoods in this salad, I should see how I feel tomorrow!!


Photo of my hair and skin on day 1.

My current measurements are:
wrists: 6"
neck: 12 1/2"
bust at widest point: 36"
bust at ribcage: 28"
waist: 24"
hips: 35"

Hair and skin photos will be updated weekly, new measurements will be posted at the end of the experiment.

Monday, May 4, 2009

Farm Dealings

I'm guessing you've been wondering where I was. I was farming! My boyfriend of six months took me on a four hour car trip to his family meat cattle farm to visit and I had a blast! Literally!


Anyway, I would like to take this moment to discuss hedonism with you. Hedonism is the act of doing things you like simply because you like them and taking no regard to others opinions about it. It's about appreciating life and for me, appreciating simplicity. I'd like to show you, the ten minute old egg.
The bread was borishingly simple white bread, but that egg, right there... was no more than ten minutes old AFTER it was boiled. This is my definition of hedonism. Taking pure delight in the simplicity of the fact I plucked this so quickly from a squawking chicken's bottom, that the egg itself was still warm as I plunged it in boiling water for 4 minutes. Topped with fresh salt, it has to be one of the world's most simple delights.

Now when you're meeting a family for the first time, cupcakes are a good way to win them over. Specifically, cupcakes with THIS frosting, which hardens very well after half an hour.

Chocolate Honey Icing
200g chocolate
150g sugar
2 'tablespoons' honey
60mL water

Boil water in a pot with sugar and honey. I say 'tablespoons' loosely here because I was privvy to some honey fresh from a hive and my tablespoons looked like something the gelatinous blob ate. So... 4-5 actual tablespoons honey. Melt all together, don't caramelize. Add chocolate chips and melt entirely. Set to cool about 15 minutes until paste-like. Apply to cupcakes. Eat. If you wait much longer, they will harden into chocolate, so either eat immediately or hide the pan from 18 year old boys.

Thursday, April 30, 2009

Raspberry PawPaw Ice Cream


After a hard week, I really needed a sweet treat. I didn't even bother to wait for it to set entirely before digging in, but who cares? I'm all for hedonism and I feel it was proper to eat a dish without having to wait. Looking up a recipe for blueberry icecream, I decided to make raspberry ice cream. Having a pawpaw in my fruit bowl, I decided on a raspberry pawpaw icecream. Having also decided that vanilla and limes would make this almost Carribean in taste, I added those too. In all modesty, it's delicious - and I made the entire recipe from Frankensteins monster into my very own.

Raspberry Papaya Vanilla Lime Ice Cream

250mL full cream milk
4 egg yolks, beaten until smooth
350mL thick cream
1/2 or 300g of papaya
500 grams frozen raspberries
100 grams sugar
1 vanilla pod
1 lime


Place cream, eggs and milk in a pan with a split vanilla pod and stir with a wooden spoon until thick. Keep an eye on it because it's not allowed to boil or curdle or the world will end. No really, it will. Bombs and everything. You don't want to end the world, do you? Didn't think so; so keep stirring!

Place raspberries, papaya, sugar and the zest and juice of the lime into a food processor with the sugar. Blitz until desired texture.

Remove vanilla pod from pan. Lick clean. Vanilla is yummy.

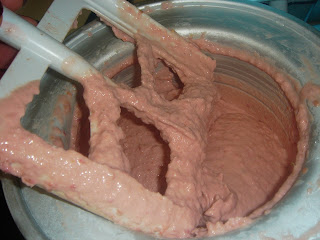
Pour fruit mixture into cream mix. Place in ice cream maker, like so:

Now, ice cream never sets properly, so this should be the best texture you should be able to get at home before placing all minus one bowl into a container in the freezer to enjoy later. Enjoy soft serve bowl of fruity goodness now, while you still can. I served mine with raspberry preserves.


The lime really brings out the flavour of the papaya and raspberries, I have to say, so please don't omit it thinking it's an odd ingredient.

This should serve 6 people. Or me.

Tuesday, April 28, 2009

Ian's Biscuits


I had started today intending on making a tutorial on chocolate lattice scrolls, but I awoke to discover upon checking my E-mail that a friend had passed away. His motorbike lost control on the highway yesterday, he found himself under a truck, and he did not make it through surgery as everyone had hoped.

I wanted to do something for his greiving family, so I thought to make a biscuit that would not only last a few days, but will be delicious and preferably chocolate dipped.

My friend, Rose H, shared her incredibly simple recipe for her Oat Dreams with me, something with few ingredients, baked up quickly and would taste great chocolate dipped.

Here she gives the recipe as follows:

4 oz/100gsoft butter
2 oz/50g caster sugar
4 oz/100g SR flour
2 oz/50g porridge oats
Serving Size : approx 20

1.Place all the ingredients into a mixing bowl and mix together well.
2.Take approx. 1 tsp of mixture and roll into a ball, flatten slightly and place on a greased baking sheet.
3.Repeat until all the mixture is used, leaving room for the mixture to spread.
4.Bake at Gas 4, 350 deg F. or 180 deg C for about 15 minutes or until golden brown.
5.Place on a wire rack to cool and crisp.


Now my first attempt turned out into a blob. When Rose says 'leaving room for mixture to spread', she means leave a LOT of room for the mixture to spread. I'd have to say I left 4cm between each bikkie and only two came out not attached to the rest. Not that it matters, foul-ups are for eating! I'm tempted to try chilling the mixture before baking to make a slightly colder butter in hopes it won't spread as much, but I feared it would be too flaky. The dough is already a bit crumbly.

My second attempt I decided to put the little biscuits into lined muffin tins. This turned out brilliantly! Except.. I overfilled them and the centres dipped a bit. Perfect to fill with chocolate if you ask me!

This is my ban-marie. A rounded copper pot I use for melting chocolate. I melted 100 grams of chocolate but for a dozen biscuits I'd only recommend 50 grams. I suppose if you don't mess up and make a cookie blob your first try, you should use the whole 100 grams.

They turned out beautifully and taste amazing! I hope Ian's family loves them as much as I do. Thank you for your recipe, Rose!

Monday, April 27, 2009

Tempering Chocolate

Hello again!

I think this blog is going to be more about technique than actual recipes, but hey, who cares, it's my blog. I want today to discuss what I promised yesterday. How and why to temper chocolate. First off, people think this is something hard and amazing and, really, it's not. It's time consuming and space stealing, but that's about it.

Tempering chocolate is moving chocolate around at a rapid pace until it takes on a thicker consistancy. The reason you do this is so that the crystals in the chocolate won't break up upon setting and you won't get a wobbly coloured piece of chocolate. Such as this:

Those spots are fat blooms. They are what happens when chocolate cools and the chocolate separates from the milk fats. It does not affect the taste of the chocolate whatsoever. However, it does affect the appearance. And as we know, appearances can be everything.

Now this may seem like a waste but I need you to melt your chocolate to around 43C and then throw the entire thing on a cool slab of marble. Any surface will work, really, but marble is much better as it retains it's temperature as you play with your chocolate for what should be around five to ten minutes, depending on amount.


Using a chocolate palette knife and, I'm not kidding here, a paint scraper, move the chocolate around, making sure it's not sticking to your surface. Now a paint scraper is not the actual clinical chocolate making tool here but it works JUST AS WELL. The only difference you'll find is a paint scraper may rust quicker. If you plan on working with chocolate for many many years, buying the proper tools is ideal... but for $3 at Bunnings, this will work just fine.

This process is a lot like kneading bread without hands. You want to move around the entire blob and mix it a well a possible. To test the chocolate, dip a small plastic spoon in it and let it dry. If it comes out warbled, it's not good. If it comes out smooth and shiny, it is good. If it comes out smooth and dull, it needs a tiny bit more work.

Now if you wish to keep using this chocolate for a few hours, keep at a steady temperature.

Dark : 32C
Milk : 30C
White : 29C

Now every 30-40 minutes when working with the chocolate test it again. If it comes out warbled it may only need a quick stir with a wooden spoon! If it starts to harden, instead of turning up the heat, apply a blowdryer to your chocolate to melt it back down. Test again.

Voila, tempered chocolate!

Introduction

Hello, my name is Elizabeth and I am a patisserie school student and aspiring apprentice for any local chef who will have me. I live in Brisbane, have three cats, four birds and am a major foodie. The irony about me is I don't like eating much - I like creating. I will bake an entire cake only to eat half a slice, and then bake another cake once I get bored with that. I love flavours so much I can't stand spending too long just trying one!

I decided an intro to a blog is boring, so I am going to discuss how to make something very simple: triangular decorative chocolate curls. Like these:


First off, you're going to need to purchase either a decorative chocolate transfer, or a plastic sheet designed to be reused over and over with a decorative design on one side. Sadly I cannot find the location to purchase the latter, nor do I know the proper name, but here is a good link to a site that sells the transfer sheets: http://www.fancyflours.com/site/chocolate-transfer-sheets.html

If using decorative reusable sheets, use eating-safe colour powders and brush the surface of your sheet to decorate. Or use food colouring melted into chocolate to splatter a design onto your board.

After you've tempered your chocolate (which I will be explaining in a future post) you will need to spread the chocolate as THINLY as possible on your transfer. Using a chocolate palette knife, make sure there are no bubbles and the surface becomes a tad dull. Quickly, using a ruler or premade plastic sheet with the lines already predone, divine the chocolate vertically into even parts, depending on the thickness you want. Then cut again horizontally in as long of strips as possible.. depending on length you want. Then place the same sheet an an angle and cut again.

Your sections should look like this:

(MSPaint for the win)

Roll up your work and tape shut, placing into your freezer until ready.

Once ready to use, unroll and break apart your little triangles apart very carefully. Eat as is, serve as is or use to decorate cakes such as this chocolate brownie coffee cake I made in class:


That's it for now. Just something simple to whet your appetetite!