Thursday, April 30, 2009

Raspberry PawPaw Ice Cream


After a hard week, I really needed a sweet treat. I didn't even bother to wait for it to set entirely before digging in, but who cares? I'm all for hedonism and I feel it was proper to eat a dish without having to wait. Looking up a recipe for blueberry icecream, I decided to make raspberry ice cream. Having a pawpaw in my fruit bowl, I decided on a raspberry pawpaw icecream. Having also decided that vanilla and limes would make this almost Carribean in taste, I added those too. In all modesty, it's delicious - and I made the entire recipe from Frankensteins monster into my very own.

Raspberry Papaya Vanilla Lime Ice Cream

250mL full cream milk
4 egg yolks, beaten until smooth
350mL thick cream
1/2 or 300g of papaya
500 grams frozen raspberries
100 grams sugar
1 vanilla pod
1 lime


Place cream, eggs and milk in a pan with a split vanilla pod and stir with a wooden spoon until thick. Keep an eye on it because it's not allowed to boil or curdle or the world will end. No really, it will. Bombs and everything. You don't want to end the world, do you? Didn't think so; so keep stirring!

Place raspberries, papaya, sugar and the zest and juice of the lime into a food processor with the sugar. Blitz until desired texture.

Remove vanilla pod from pan. Lick clean. Vanilla is yummy.

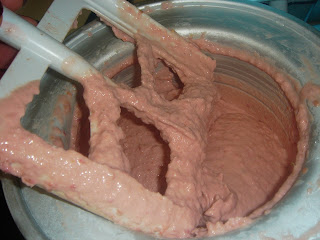
Pour fruit mixture into cream mix. Place in ice cream maker, like so:

Now, ice cream never sets properly, so this should be the best texture you should be able to get at home before placing all minus one bowl into a container in the freezer to enjoy later. Enjoy soft serve bowl of fruity goodness now, while you still can. I served mine with raspberry preserves.

The lime really brings out the flavour of the papaya and raspberries, I have to say, so please don't omit it thinking it's an odd ingredient.

This should serve 6 people. Or me.

Tuesday, April 28, 2009

Ian's Biscuits


I had started today intending on making a tutorial on chocolate lattice scrolls, but I awoke to discover upon checking my E-mail that a friend had passed away. His motorbike lost control on the highway yesterday, he found himself under a truck, and he did not make it through surgery as everyone had hoped.

I wanted to do something for his greiving family, so I thought to make a biscuit that would not only last a few days, but will be delicious and preferably chocolate dipped.

My friend, Rose H, shared her incredibly simple recipe for her Oat Dreams with me, something with few ingredients, baked up quickly and would taste great chocolate dipped.

Here she gives the recipe as follows:

4 oz/100gsoft butter
2 oz/50g caster sugar
4 oz/100g SR flour
2 oz/50g porridge oats
Serving Size : approx 20

1.Place all the ingredients into a mixing bowl and mix together well.
2.Take approx. 1 tsp of mixture and roll into a ball, flatten slightly and place on a greased baking sheet.
3.Repeat until all the mixture is used, leaving room for the mixture to spread.
4.Bake at Gas 4, 350 deg F. or 180 deg C for about 15 minutes or until golden brown.
5.Place on a wire rack to cool and crisp.


Now my first attempt turned out into a blob. When Rose says 'leaving room for mixture to spread', she means leave a LOT of room for the mixture to spread. I'd have to say I left 4cm between each bikkie and only two came out not attached to the rest. Not that it matters, foul-ups are for eating! I'm tempted to try chilling the mixture before baking to make a slightly colder butter in hopes it won't spread as much, but I feared it would be too flaky. The dough is already a bit crumbly.

My second attempt I decided to put the little biscuits into lined muffin tins. This turned out brilliantly! Except.. I overfilled them and the centres dipped a bit. Perfect to fill with chocolate if you ask me!

This is my ban-marie. A rounded copper pot I use for melting chocolate. I melted 100 grams of chocolate but for a dozen biscuits I'd only recommend 50 grams. I suppose if you don't mess up and make a cookie blob your first try, you should use the whole 100 grams.

They turned out beautifully and taste amazing! I hope Ian's family loves them as much as I do. Thank you for your recipe, Rose!

Monday, April 27, 2009

Tempering Chocolate

Hello again!

I think this blog is going to be more about technique than actual recipes, but hey, who cares, it's my blog. I want today to discuss what I promised yesterday. How and why to temper chocolate. First off, people think this is something hard and amazing and, really, it's not. It's time consuming and space stealing, but that's about it.

Tempering chocolate is moving chocolate around at a rapid pace until it takes on a thicker consistancy. The reason you do this is so that the crystals in the chocolate won't break up upon setting and you won't get a wobbly coloured piece of chocolate. Such as this:

Those spots are fat blooms. They are what happens when chocolate cools and the chocolate separates from the milk fats. It does not affect the taste of the chocolate whatsoever. However, it does affect the appearance. And as we know, appearances can be everything.

Now this may seem like a waste but I need you to melt your chocolate to around 43C and then throw the entire thing on a cool slab of marble. Any surface will work, really, but marble is much better as it retains it's temperature as you play with your chocolate for what should be around five to ten minutes, depending on amount.


Using a chocolate palette knife and, I'm not kidding here, a paint scraper, move the chocolate around, making sure it's not sticking to your surface. Now a paint scraper is not the actual clinical chocolate making tool here but it works JUST AS WELL. The only difference you'll find is a paint scraper may rust quicker. If you plan on working with chocolate for many many years, buying the proper tools is ideal... but for $3 at Bunnings, this will work just fine.

This process is a lot like kneading bread without hands. You want to move around the entire blob and mix it a well a possible. To test the chocolate, dip a small plastic spoon in it and let it dry. If it comes out warbled, it's not good. If it comes out smooth and shiny, it is good. If it comes out smooth and dull, it needs a tiny bit more work.

Now if you wish to keep using this chocolate for a few hours, keep at a steady temperature.

Dark : 32C
Milk : 30C
White : 29C

Now every 30-40 minutes when working with the chocolate test it again. If it comes out warbled it may only need a quick stir with a wooden spoon! If it starts to harden, instead of turning up the heat, apply a blowdryer to your chocolate to melt it back down. Test again.

Voila, tempered chocolate!

Introduction

Hello, my name is Elizabeth and I am a patisserie school student and aspiring apprentice for any local chef who will have me. I live in Brisbane, have three cats, four birds and am a major foodie. The irony about me is I don't like eating much - I like creating. I will bake an entire cake only to eat half a slice, and then bake another cake once I get bored with that. I love flavours so much I can't stand spending too long just trying one!

I decided an intro to a blog is boring, so I am going to discuss how to make something very simple: triangular decorative chocolate curls. Like these:


First off, you're going to need to purchase either a decorative chocolate transfer, or a plastic sheet designed to be reused over and over with a decorative design on one side. Sadly I cannot find the location to purchase the latter, nor do I know the proper name, but here is a good link to a site that sells the transfer sheets: http://www.fancyflours.com/site/chocolate-transfer-sheets.html

If using decorative reusable sheets, use eating-safe colour powders and brush the surface of your sheet to decorate. Or use food colouring melted into chocolate to splatter a design onto your board.

After you've tempered your chocolate (which I will be explaining in a future post) you will need to spread the chocolate as THINLY as possible on your transfer. Using a chocolate palette knife, make sure there are no bubbles and the surface becomes a tad dull. Quickly, using a ruler or premade plastic sheet with the lines already predone, divine the chocolate vertically into even parts, depending on the thickness you want. Then cut again horizontally in as long of strips as possible.. depending on length you want. Then place the same sheet an an angle and cut again.

Your sections should look like this:

(MSPaint for the win)

Roll up your work and tape shut, placing into your freezer until ready.

Once ready to use, unroll and break apart your little triangles apart very carefully. Eat as is, serve as is or use to decorate cakes such as this chocolate brownie coffee cake I made in class:


That's it for now. Just something simple to whet your appetetite!